I see threads all the time where people complain about game installers that have DirectX install wizards that pop up mid install, or about the size of the end user redistributable bloating their game installer. I understand why this is a problem, there’s lots of advice and documentation telling you what NOT to do when distributing DirectX (Don’t just include the dlls in your install folder!), but not much in the way of what you SHOULD do. So after seeing another iteration of this discussion on this recent Reddit thread, I decided I’d write this post so that those who are unsure of how to redistribute DirectX in their own games installer will be able to get it right (BTW - the installer in the linked thread is doing it wrong despite the thread title).
Step 1 – Create a minimal installation package
Most Windows installs already have DirectX installed by default, Windows XP SP2+ includes DirectX 9.0c, Windows Vista includes DirectX 9&10 (and SP2 includes DirectX 11), and Windows 7 includes 9,10&11 right out of the box. So really all you have to do to ensure that all prerequisites are installed correctly is to ensure that any dll’s you use that are part of the DirectX SDK and NOT part of the core DirectX install are installed.
The first step in doing this is to go to the DirectX SDK install directory (usually something like “C:\Program Files (x86)\Microsoft DirectX SDK (June 2010)”) and go into the Redist folder. Create a new folder somewhere else on disk and copy the following files from the Redist folder into it
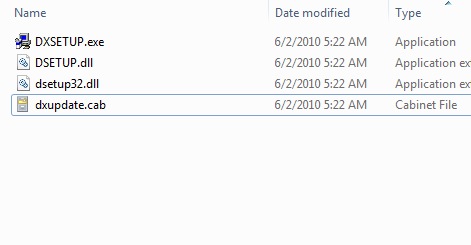
- DXSetup.exe
- DSETUP.dll
- dsetup32.dll
- dxupdate.cab
You should now have a folder that looks something like the following
Step 2 – Determine what D3D libraries you are using
Now you need to find what D3D libraries your solution is actually using. If you’re not sure (and your using c++) In Visual Studio, go to project properties and you probably have these listed under the ‘Additional Dependencies’ field in the Linker->Input window. Take note of any .lib files starting with d or x (e.g. xinput.lib or d3dx9.lib).
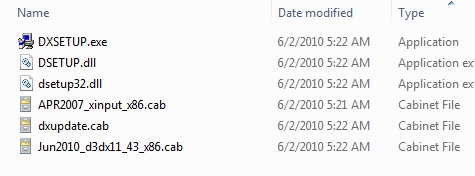
Now go back to the DirectX SDK Redist folder and for each lib you identified, grab the most recent copy of the corresponding .cab file. For example, if you are using d3dx9.lib, then (assuming you are using the June 2010 SDK) you would grab Jun2010_d3dx9_43_x86.cab (also assuming your game is compiled as a 32 bit application – if not, go with the x64 versions of the same .cab). Similarly if you were using xinput.lib, you would grab APR2007_xinput_x86.cab. Copy all the selected .cab files across to your install package folder we created in the previous step.
You should now have a folder that looks something like the following
Step 3 – Bundle these files in your installer and execute DXSETUP silently
The files you identified above are all that are required to install the DirectX prerequisites on any users machine. Note how its only a fraction of the size of the full end user redistributable. Now make sure to include all those files in your installer, then at install time, extract them to a temp folder and run DXSETUP.exe with the /silent argument like so
dxsetup.exe /silent
It is critical that you use the /silent argument as this prevents the DirectX installer UI popping up during your own install. Don’t worry if the user already has the prerequisites, the dxsetup program is smart enough to not install anything that is already installed.
Here’s an example from Junkship’s nsis installer script which does the DirectX install
;--------------------------------
; install directx11 update
Section "Install Directx 11 June 2010 update"

    SetOutPath $TEMP\Junkship
    File dxredist\*.cab
    File dxredist\*.dll
    File dxredist\DXSETUP.exe

    ExecWait '"$TEMP\Junkship\dxsetup.exe" /silent'
    SetOutPath $TEMP
    RMDIR /r $TEMP\Junkship\dxredist
SectionEnd
Step 4 – Profit!
That’s it! (though if you are using DirectX 11 and want to support windows Vista users, you may need to do some additional prerequisite checking as detailed in this article)
NOTE: Most of the information included from this post was sourced from this MSDN article if you want to know more